
How to make custom keycaps resin is a fantastic way to upgrade your desktop aesthetic and bring personalized art right onto your mechanical keyboard. If you love the look of crystal-clear epoxy art, matching your handmade keys with a premium artisan light fixture can truly transform your workspace. Join Resin Lamp LLC as we explore the detailed process of crafting your very own unique resin keycap right below!
Everything You Need to Prepare Before Casting Your Custom Keycaps
Before diving into the creative process, understanding how to make custom keycaps resin begins with setting up a safe and well-equipped workspace. Having the right supplies ready not only streamlines your crafting workflow but also ensures your artisan projects cure with crystal-clear perfection.
- Resin: Choosing the right medium is the first step in learning how to make custom keycaps resin. You can use crystal-clear Epoxy Resin for deep, multi-layered designs or UV Resin if you want a fast-curing process under a UV lamp.
- Keycap Silicone Molds: These are specialized molds available in various profiles like OEM, Cherry, or SA, consisting of a base for the outer shape and a stem cap for the cross-shaped switch connection.
- Decorative Elements: Prepare your choice of mica pigments, alcohol inks, glitter, gold foil, or miniature charms to create unique internal designs.
- Safety Gear: Always wear nitrile gloves, safety goggles, and a proper respirator mask to protect yourself from chemical fumes and skin contact.
- Mixing Supplies: Use graduated measuring cups for precise ratios alongside wooden stir sticks to blend the components smoothly.
- Finishing Tools: Keep a mini heat gun or a fine mist of rubbing alcohol nearby to pop surface bubbles, plus high-grit sandpaper and polishing compound for the final touch.

How To Make Custom Keycaps Resin: Collection of resin, molds, and safety supplies needed for crafting professional-quality, detailed, and custom mechanical keyboard artisan keycaps
A clear guide on how to make custom keycaps resin from start to finish
Following a structured blueprint on how to make custom keycaps resin requires patience to ensure the final product fits your mechanical keyboard perfectly. By practicing this standard casting procedure, you can easily control the chemical reaction of the liquid plastic and achieve a smooth, professional result.
Step 1: Mixing the Resin
The foundation of learning how to make custom keycaps resin begins with a perfect mix. Carefully measure Part A (resin) and Part B (hardener) according to the exact product ratio. Stir the mixture slowly in one direction for about 3 minutes to avoid trapping stubborn micro-bubbles, then let it rest for 3 minutes so existing bubbles can pop naturally.
Step 2: Coloring and Decorating
Divide your clear resin into smaller mixing cups if you want a multi-colored layout. Gently blend in your choice of mica pigments, alcohol inks, or glitter until the color is completely uniform. For advanced designs, use tweezers to carefully position miniature charms, dried flowers, or gold foil directly inside the silicone mold.
Step 3: Pouring into the Mold
Slowly pour the resin into the main body of the keycap mold. Use a toothpick to gently guide the resin into every sharp corner to prevent hidden air pockets. Next, add a small drop of resin into the stem cap (the cross-shaped switch connection) and firmly press the two mold halves together, squeezing out any excess liquid.

How To Make Custom Keycaps Resin: Pouring clear mixed liquid plastic into a silicone keycap mold and using a toothpick to remove air bubbles while practicing how to make custom keycaps resin
Step 4: Curing the Resin
Place your filled mold in a well-ventilated, dust-free area. Standard Epoxy Resin needs to sit undisturbed for 16 to 24 hours to cure completely. If you are using UV Resin instead, place the mold directly under a 36W UV lamp for 2 to 5 minutes per side until the entire piece is completely hard and cool.
Step 5: Demolding and Finishing
Gently peel away the silicone mold to reveal your brand-new artisan keycap. Carefully trim away any thin excess plastic (flash resin) around the bottom rim using a sharp craft knife. Mastering how to make custom keycaps resin with a professional feel means sanding the bottom edges with high-grit wet sandpaper and finishing with a polishing compound for a crystal-clear shine.
Top creative concepts that every keyboard enthusiast loves to make
Choosing the right theme is a great way to practice your skills and make your keyboard stand out. Looking at successful designs in the community will give you practical ideas on how to mix colors, place miniatures, and use lighting effectively.
Pikachu Ball Keycap
This vibrant concept captures a miniature Pikachu Ball Keycap world inside an ultra-clear resin shell, making it a massive hit for Nintendo fans. When exploring how to make custom keycaps resin with a scenic theme, this layout features a detailed Pikachu figurine sitting in a green meadow, surrounded by tiny Pokéballs and pink mushrooms that glow beautifully under backlighting.
To replicate this look successfully, you should practice a multi-stage pouring technique rather than casting everything at once. Start by creating and curing the green grassy base layer first, use fine tweezers to carefully position the tiny figures on top, and then pour a high-grade, crystal-clear epoxy layer over them to achieve a flawless, bubble-free finish.
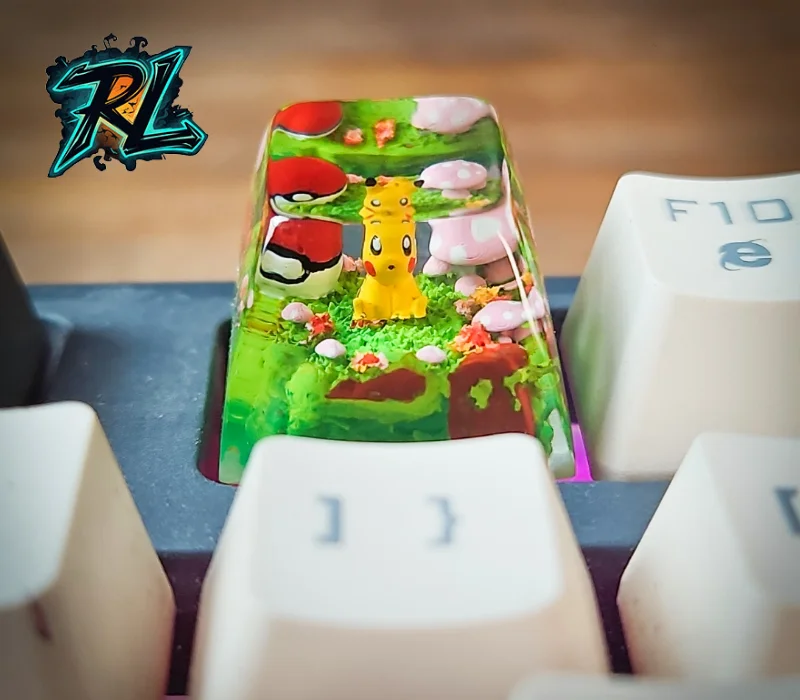
How To Make Custom Keycaps Resin: A miniature Pikachu figurine sitting on a green grass field with tiny Pokéballs inside a crystal clear resin keycap
Thanos’s Infinity Gauntlet Keycap
Designed specifically for Marvel enthusiasts and high-end gaming setups, the Thanos’s Infinity Gauntlet Keycap centers around the legendary golden weapon of the Mad Titan. In this realistic design, the intricate gauntlet model is set against a rugged, dark volcanic rock terrain, with each of the six miniature Infinity Stones delicately detailed with vibrant colors to catch the eye with every keystroke.
Achieving the perfect metallic texture on such a small scale is the main challenge of this design. When learning how to make custom keycaps resin with complex gaming themes, it is highly recommended to dust the mold with fine metallic gold mica powder or apply a subtle layer of gold-leaf acrylic paint onto the gauntlet figurine before locking it safely inside the clear resin matrix.
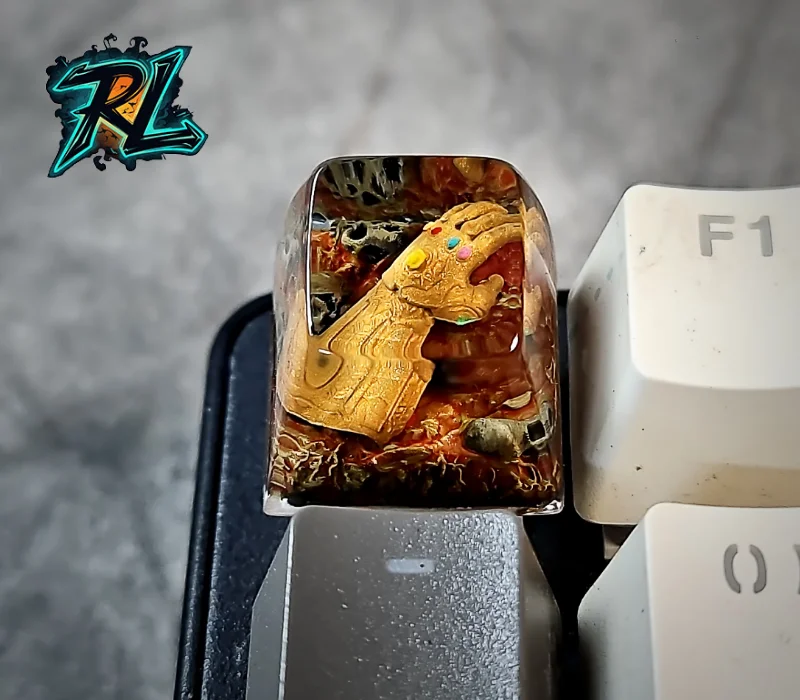
How To Make Custom Keycaps Resin: Close-up shot of a golden Thanos gauntlet model with vibrant infinity stones crafted inside a clear mechanical keyboard keycap
Cheshire Cat Keycap
This stunning design pulls a dark, mystical forest theme straight out of Wonderland to add an enchanting, eerie vibe to your desktop setup. The Cheshire Cat Keycap highlights the iconic, wide-eyed grin of the legendary cat perched atop an organic tree branch, surrounded by dense mossy ground and neon-pink mushrooms nestled beneath a thick green foliage canopy that creates an incredible sense of mystery.
This profile serves as an excellent project for mastering depth and creating a fascinating 3D “aquarium effect” within your keycap. By understanding how to make custom keycaps resin using layered pouring—tinting the very bottom layers with dark green or black alcohol inks while keeping the upper layers perfectly transparent—you can make the cat look as if it is floating deep inside a magical woods.

How To Make Custom Keycaps Resin: An artisan keycap featuring the iconic Cheshire Cat model sitting on organic mossy ground with tiny pink mushrooms
Chucky Keycap
Perfect for horror movie buffs, the Chucky Keycap adds a bold, rebellious, and playful edge to any mechanical keyboard layout. It features the infamous killer doll rendered in a miniature chibi style—complete with his classic denim overalls and striped shirt—standing next to a small tree under a perfectly smooth, rounded resin dome that beautifully magnifies every frightening detail.
The key to mastering how to make custom keycaps resin with this specific layout is managing the height of the vertical figurine to ensure it fits perfectly within the profile without touching the edges. When assembling the mold, you must press the stem cap down very gently and evenly to prevent the standing Chucky figure from tilting or shifting out of the center.

How To Make Custom Keycaps Resin: A small horror movie doll figurine standing on a green mossy lawn next to a tiny leafless tree under resin
Discover Extraordinary Mechanical Keyboards with Resin Lamp LLC
While learning how to make custom keycaps resin unlocks your creativity, partnering with a professional studio elevates your gaming station instantly. At Resin Lamp LLC, we transform standard setups into magnificent visual experiences, adding a mesmerizing aesthetic to your workspace with our theme-driven collections.
- Flawless Transparency: Every single piece is cast using premier materials and undergoes rigorous multi-stage polishing to ensure a glass-like shine that beautifully passes backlighting.
- Tailored Personality: Our experienced team crafts distinct aesthetics that help mechanical keyboard collectors and gamers voice their authentic style through their desk setups.
- Engineered for Performance: We merge striking fine-art visual concepts with maximum durability, creating rugged stems that withstand heavy daily typing sessions.
- Global Delivery Network: We safely ship our custom artisan products across the globe using heavy-duty, protective packaging so your custom order arrives intact.
Ultimately, your desk space is a direct reflection of your inner passion. Let us help you blend meticulous artistry, top-tier reliability, and bold individual expression into every single keystroke.
Whether you’re searching for a stunning resin lamp, anime-inspired decor, or a personalized gift, Resin Lamp LLC is here!
Contact us:
📧 resinlampart@gmail.com
🌐 https://resin-lamp-llc.com/


